Clip-A-Doodle-Draw How to Use
This article contains promotions.
Overview
“Clip-A-Doodle-Draw” is a simple telestration tool that allows you to draw and annotate on videos while watching them. This app was developed to support the easy explanation and analysis of match content, such as soccer.
・Since version 1.6.0: Match video recording with a scoreboard overlay.
・Since version 1.10.0: Highlight recording during capture, instant timestamp navigation during playback, and video sharing to YouTube and other platforms.
Basic App Usage Guide
1. Main Features and Usage
1.1 Video Playback
You can play videos saved on your device or videos uploaded to YouTube (specifically, the web version of the YouTube video playback page).
1.2 Drawing Shapes and Adding Text
You can draw freehand or shapes and add text while playing videos.
The drawings you make will not be reflected in the original video.
1.3 Video Recording and Saving (Available from v1.6.0)
You can record and save match videos with a scoreboard overlay.
Drawings made with the drawing tools are not recorded.
1.4 Highlight Timing Recording and Playback Navigation (Available from v1.10.0)
Highlight moments can be marked at any time during recording, and playback can jump directly to those timestamps.
In soccer mode (default), the timing when a score is added is automatically recorded, and playback can jump directly to those timestamps.
1.5 Recorded Video Sharing (Available from v1.10.0)
Recorded videos can be shared from Clip‑A‑Doodle‑Draw to YouTube and other platforms:
- When sharing, a list of timestamped highlights can be copied to the clipboard for chapter creation and other uses.
- Timestamped highlights allow jumping directly to scenes using YouTube’s chapter display.
- Chapter jumps are also supported when playing videos inside Clip‑A‑Doodle‑Draw.
2. Basic Operations(Playback & Drawing)
2.1 Importing Videos
<For videos saved on your device>:
- Select the “Video file” tab on the home screen (this is the default selection).
- Tap “Open Video File” to select the video you want to play from your device.
- Tap “Play Video” to go to the playback screen and start the video.
<For videos uploaded to YouTube>:
- Select the “YouTube video” tab on the home screen.
- Enter the URL or Video ID of the video you want to play in the input field.
- Tap “Play YouTube Video” to go to the playback screen and start the video.
You can also send a video URL to Clip-A-Doodle-Draw via the “Share” feature in the YouTube app or the web version of YouTube. In that case, the URL will automatically be populated in the input field.
2.2 Video Playback
<For videos saved on your device>:
- You can control video playback (play/pause, etc.) from the control bar at the bottom of the screen.
- The control bar can be hidden by tapping the [ < ] button at the right end of the bar.
- You can slide the progress bar to skip to any scene in the video.
Supported video formats are MP4 and MOV.
While playing:
- 10-second skip/rewind: You can skip forward or rewind the video in 10-second intervals.
- Speed Control: You can play the video at 2x, 4x, or 8x speed. The speed changes each time you press the button.
While paused:
- 3-frame skip/rewind: You can move the video forward or backward in 3-frame intervals.
- Slow Motion: You can play the video at 0.5x or 0.2x speed. The speed changes each time you press the button.
<For videos uploaded to YouTube>:
- The operation is the same as the web version of YouTube.
- When controlling the video, please turn off the drawing tools.
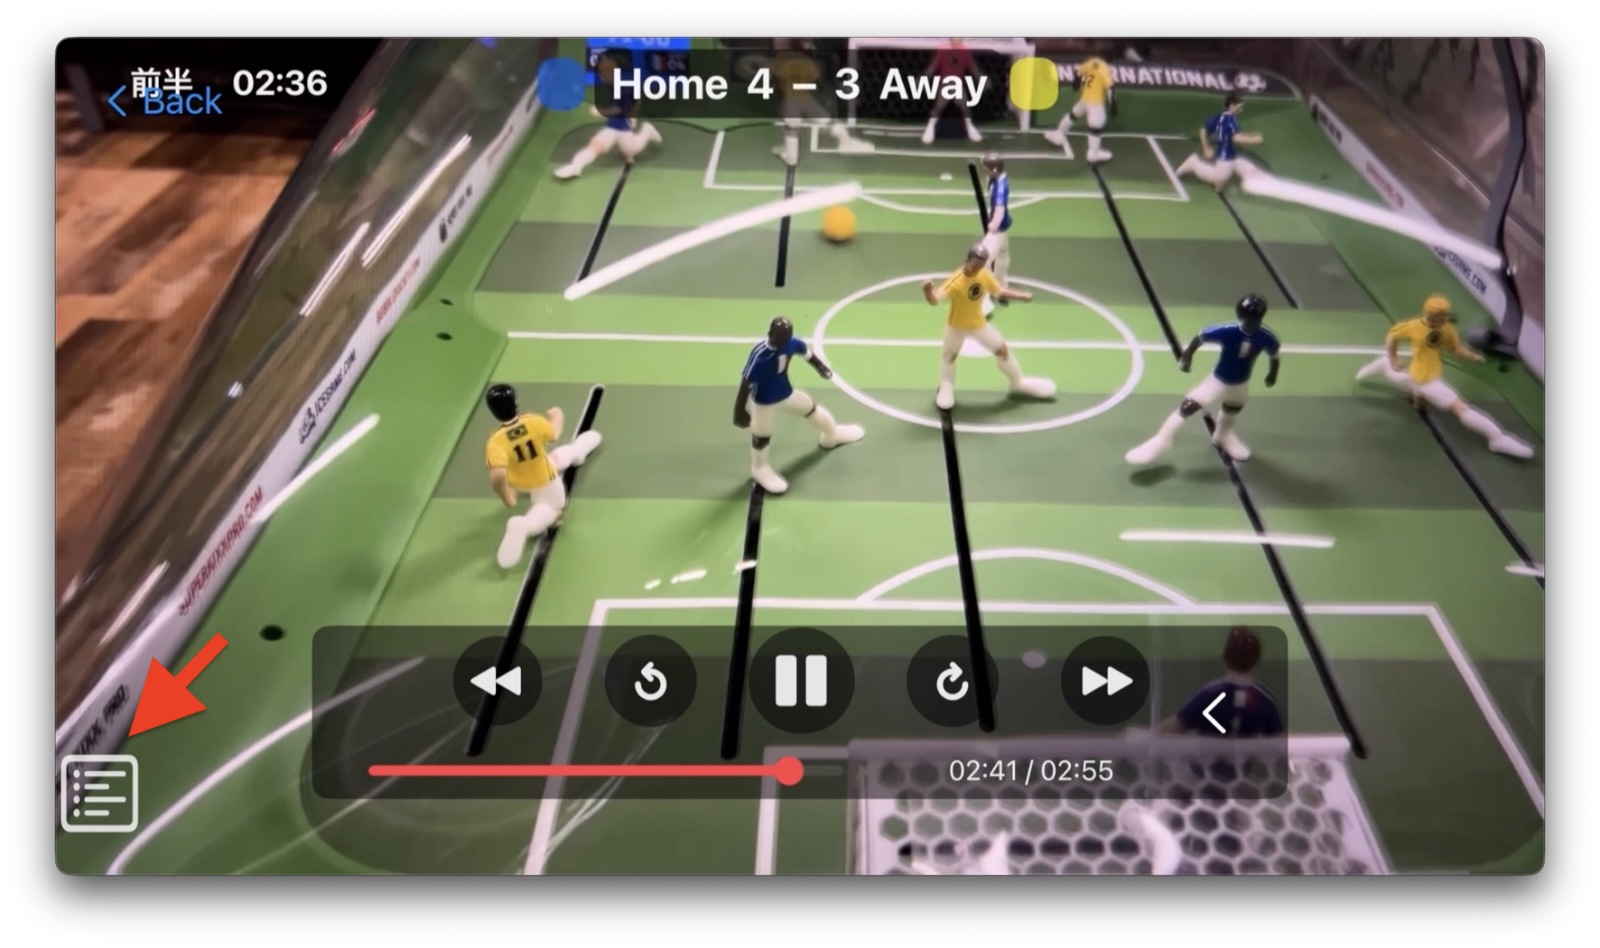
<Jump to Highlights/Chapters>
If highlight timings are recorded during video capture (for soccer, goals are also automatically recorded), tap the Highlight List button in the lower-left corner of the screen to display the list of highlights.
When playing a YouTube video, if the video includes chapters, a chapter list will be displayed instead.
Select a scene from the list to instantly jump to that moment in the video.
You can also use the slider at the bottom of the list to start playback a few seconds before the selected highlight.
2.3 Drawing
- Tap the drawing tool on the right side of the screen to select it and start drawing.
- To turn off the drawing tool, tap it again. (Please turn off the drawing tool when controlling a YouTube video.)
- Tap the [ > ] button next to the drawing tools to hide the tools.
Drawing tools:
- Pen Tool: Draw freehand lines on the video.
- Shape Tool: Add shapes such as arrows, rectangles, or circles.
- Text Tool: Add annotations on the video.
- Shape Move Tool: Move the shapes or text you’ve drawn (move in drawing units).
- Line Thickness Tool: Adjust the size of lines and text.
- Color Selector Tool: Select a color.
- Polygon Area Tool: Add a Region Enclosed by Specified Vertices
- Setting Vertices
- To set the vertices of the area you want to draw, select the Polygon Area Drawing Tool and tap on the screen. A new vertex will be added each time you tap.
- Completing the Drawing
- To complete the area, tap on any of the vertices you have set. The vertices will be connected, and the area enclosed by them will be drawn.
- Setting Vertices
2.4 Applying Visual Effects(ver1.3.0 – )
- Drawing Shapes with a Perspective Effect
- A sense of depth can be added to shapes, giving them a slightly three-dimensional appearance.
- A sense of depth can be added to shapes, giving them a slightly three-dimensional appearance.
To apply this effect:
- Turn on the Perspective Effect button
 before you start drawing.
 - Use the slider to adjust the level of perspective effect to achieve the desired look.
 represents the point that serves as the basis for determining the sense of depth. Moving its coordinates changes how the depth of the shapes appears.
 represents the approximate position of the camera during video recording.
- Dynamic Gradient Effect
- A dynamic gradient effect can be applied to shapes, adding a slightly more polished appearance.
To use this effect:
- Turn on the Gradient Effect button before you start drawing.
- Draw a shape.
2.5 Deleting Drawings and Undo/Redo Operations
- Select the tool for deleting drawings from the drawing tools.
Deletion tools:
- Eraser Tool: Enclose the drawing you want to erase, and it will be deleted (in drawing units).
- Trash Can Tool: Delete all drawings on the screen at once.
- Use the buttons on the left side of the drawing tools to undo or redo actions.
Undo/Redo buttons:
- Undo Button: Undo the last drawing action.
- Redo Button: Redo a canceled drawing action.
2.6 Taking Snapshots (ver.1.4.0-)
You can take snapshots using the camera icon located at the top-right corner of the screen.
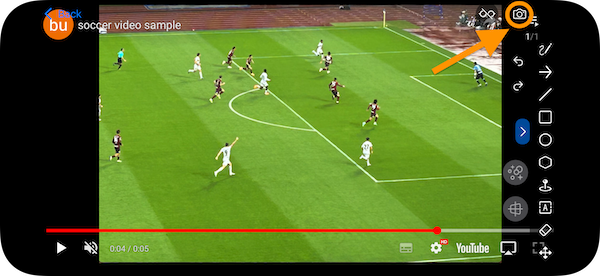
Captured snapshots are saved to the Photos app.
Afterward, you can share the snapshots through other apps.
2.7 Toggle Display/Hide Controls During YouTube Pause (ver.1.4.0-)
You can toggle the visibility of control bars and other elements displayed when pausing on the YouTube playback screen.

2.8 Object Tracking (ver. 1.5.0 -)
Object tracking is a feature that automatically follows the movement of a target object.
*This feature can only be used with videos saved on the device.
・How to Use
Enclose the Target
Use one of the available tools—rectangle, circle, or ellipse—to enclose the object you want to track.
Enable Tracking Mode
After enclosing the object, press and hold to activate tracking mode. A red dashed box will appear around the selected shape.
Start/Stop Tracking
Turn the tracking button ON to start tracking.
Turn the tracking button OFF to stop tracking.
・Important Notes
- If the tracked object moves out of the screen, tracking will stop.
- Tracking accuracy is affected by factors such as the object’s movement, video quality, and overlapping with other objects. In particular, tracking may become difficult if the object overlaps with other objects.
3. Basic Operations (Recording & Saving) (Available from v1.6.0)
💡 Tip
For stable recording, we recommend enabling Airplane Mode during recording.
This helps prevent interruptions from calls and notifications.
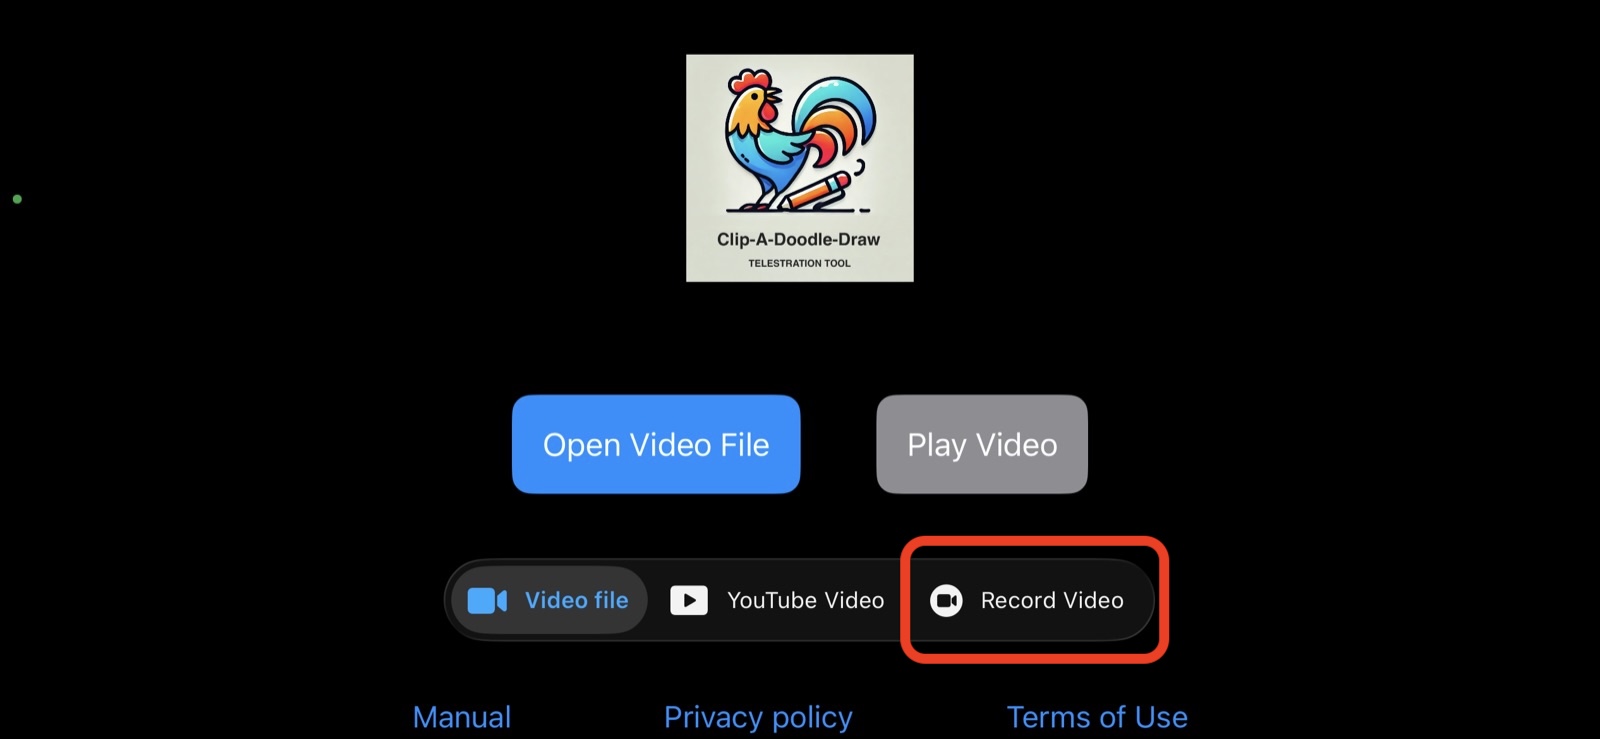
From the Home screen, tap “Record Video” to open the recording screen.
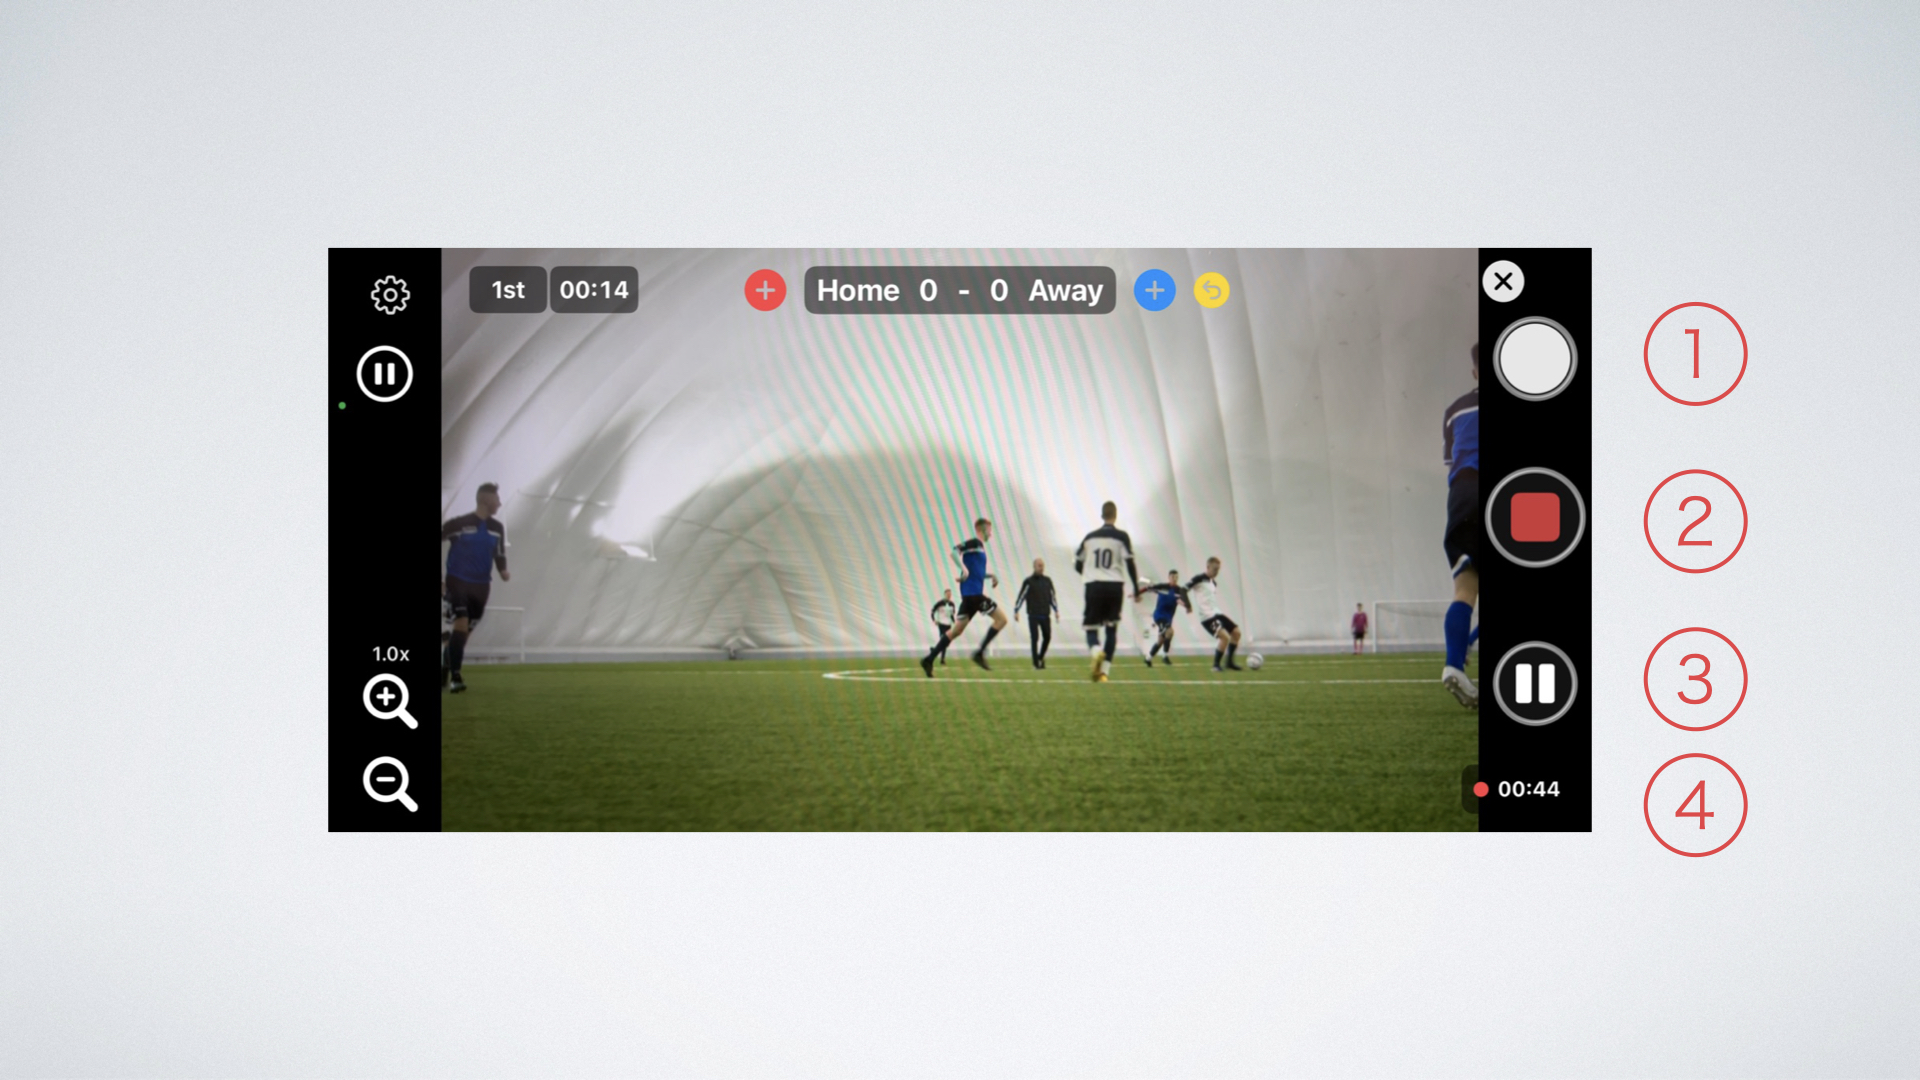
3.1 Recording Screen (Not Recording)
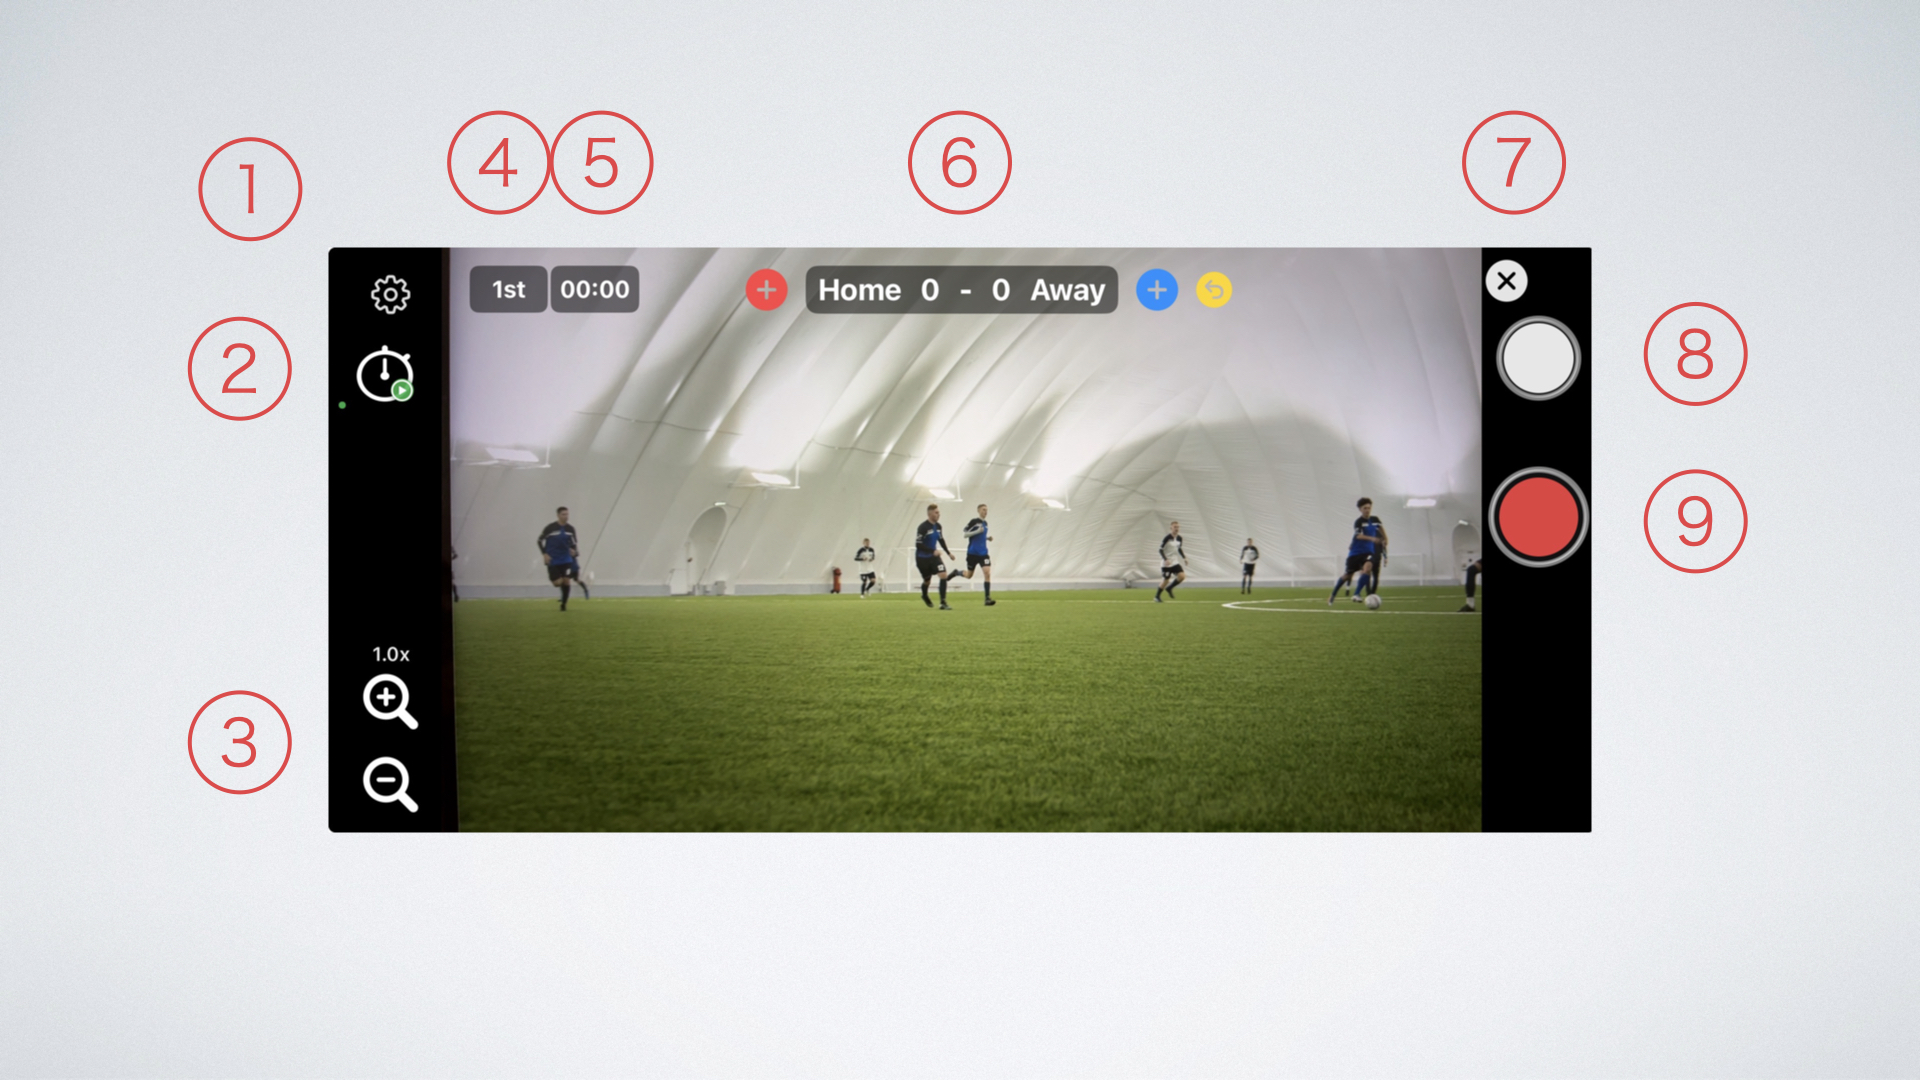
| ① | Settings Button | Opens the Settings screen. |
| ② | Match Timer Button | Starts and pauses the match timer. |
| ③ | Zoom Buttons | Single tap for 0.1 step zoom(ver1.10.0-). Press and hold either button for continuous zoom in or out. |
| ④ | Match Period Selector | Displays the current match period. Tap to open a drop-down menu and select the match period (First Half, Second Half, PK, etc.). |
| ⑤ | Match Timer Display & Reset | Tapping the timer display opens a dialog that lets you reset the match timer. The timer keeps running even when recording is paused. |
| ⑥ | Scoreboard | ・Tap the team name or score to edit the team name and team color. ・Tap the ⊕ button to increase the score. ・Tap the back button to undo the previous score change. |
| ⑦ | Exit Recording Screen Button | Tap the ✖️ button to close the recording screen and return to the Home screen. |
| ⑧ | Still Image Capture Button | Saves a single frame from the video as an image. The scoreboard is not included if recording is stopped. |
| ⑨ | Record/Stop Button | Tap this button to start recording. Tap it again while recording to stop, and the video will be saved to your Photos app. |
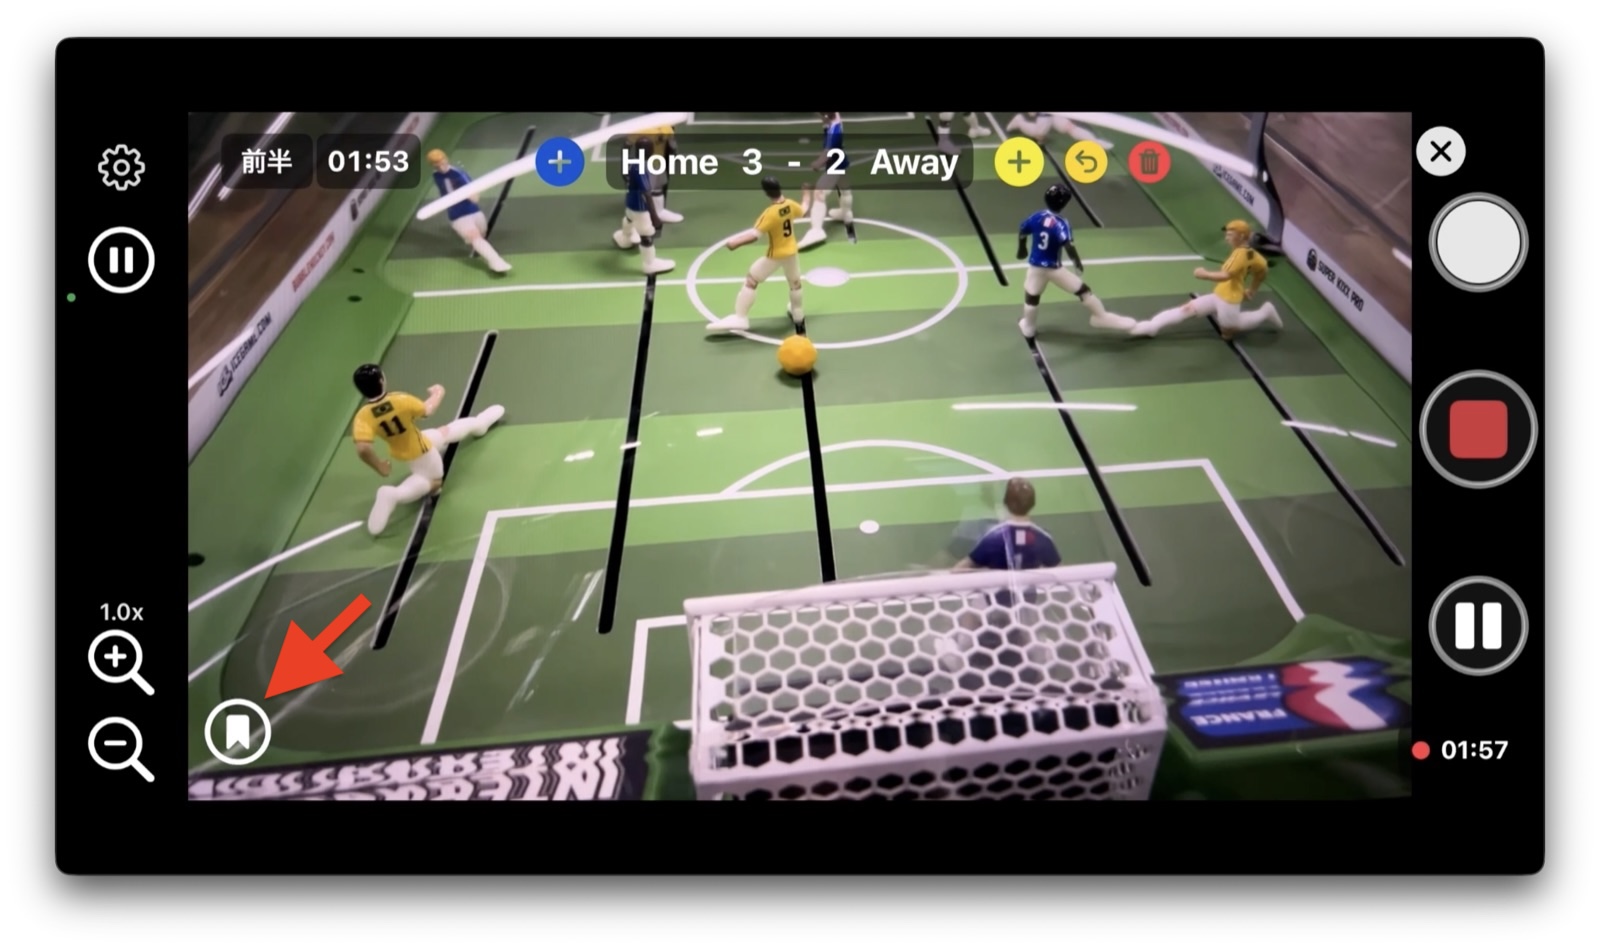
3.2 Recording Screen (Recording)
| ① | Still Image Capture Button | Saves a single frame from the video as an image. The scoreboard will be included if recording is in progress. |
| ② | Record/Stop Button | While recording, tap the REC button to stop. The recorded video will be saved to your Photos app. |
| ③ | Pause/Resume Button | Tap to pause or resume recording. The footage recorded before pausing and after resuming is saved as a single video file. 💡 Tip: Pausing does not stop the match timer or scoreboard. |
| ④ | Recording Time Display | Indicates that recording is in progress and shows how much time has passed since the start of recording. |
<Highlight Timestamp Recording> (ver. 1.10.0+)
Tap the Highlight Record button in the lower-left corner of the screen to record the current timestamp. During playback, you can jump directly to the recorded moment.
For soccer mode (default), goal timings are automatically recorded as well.
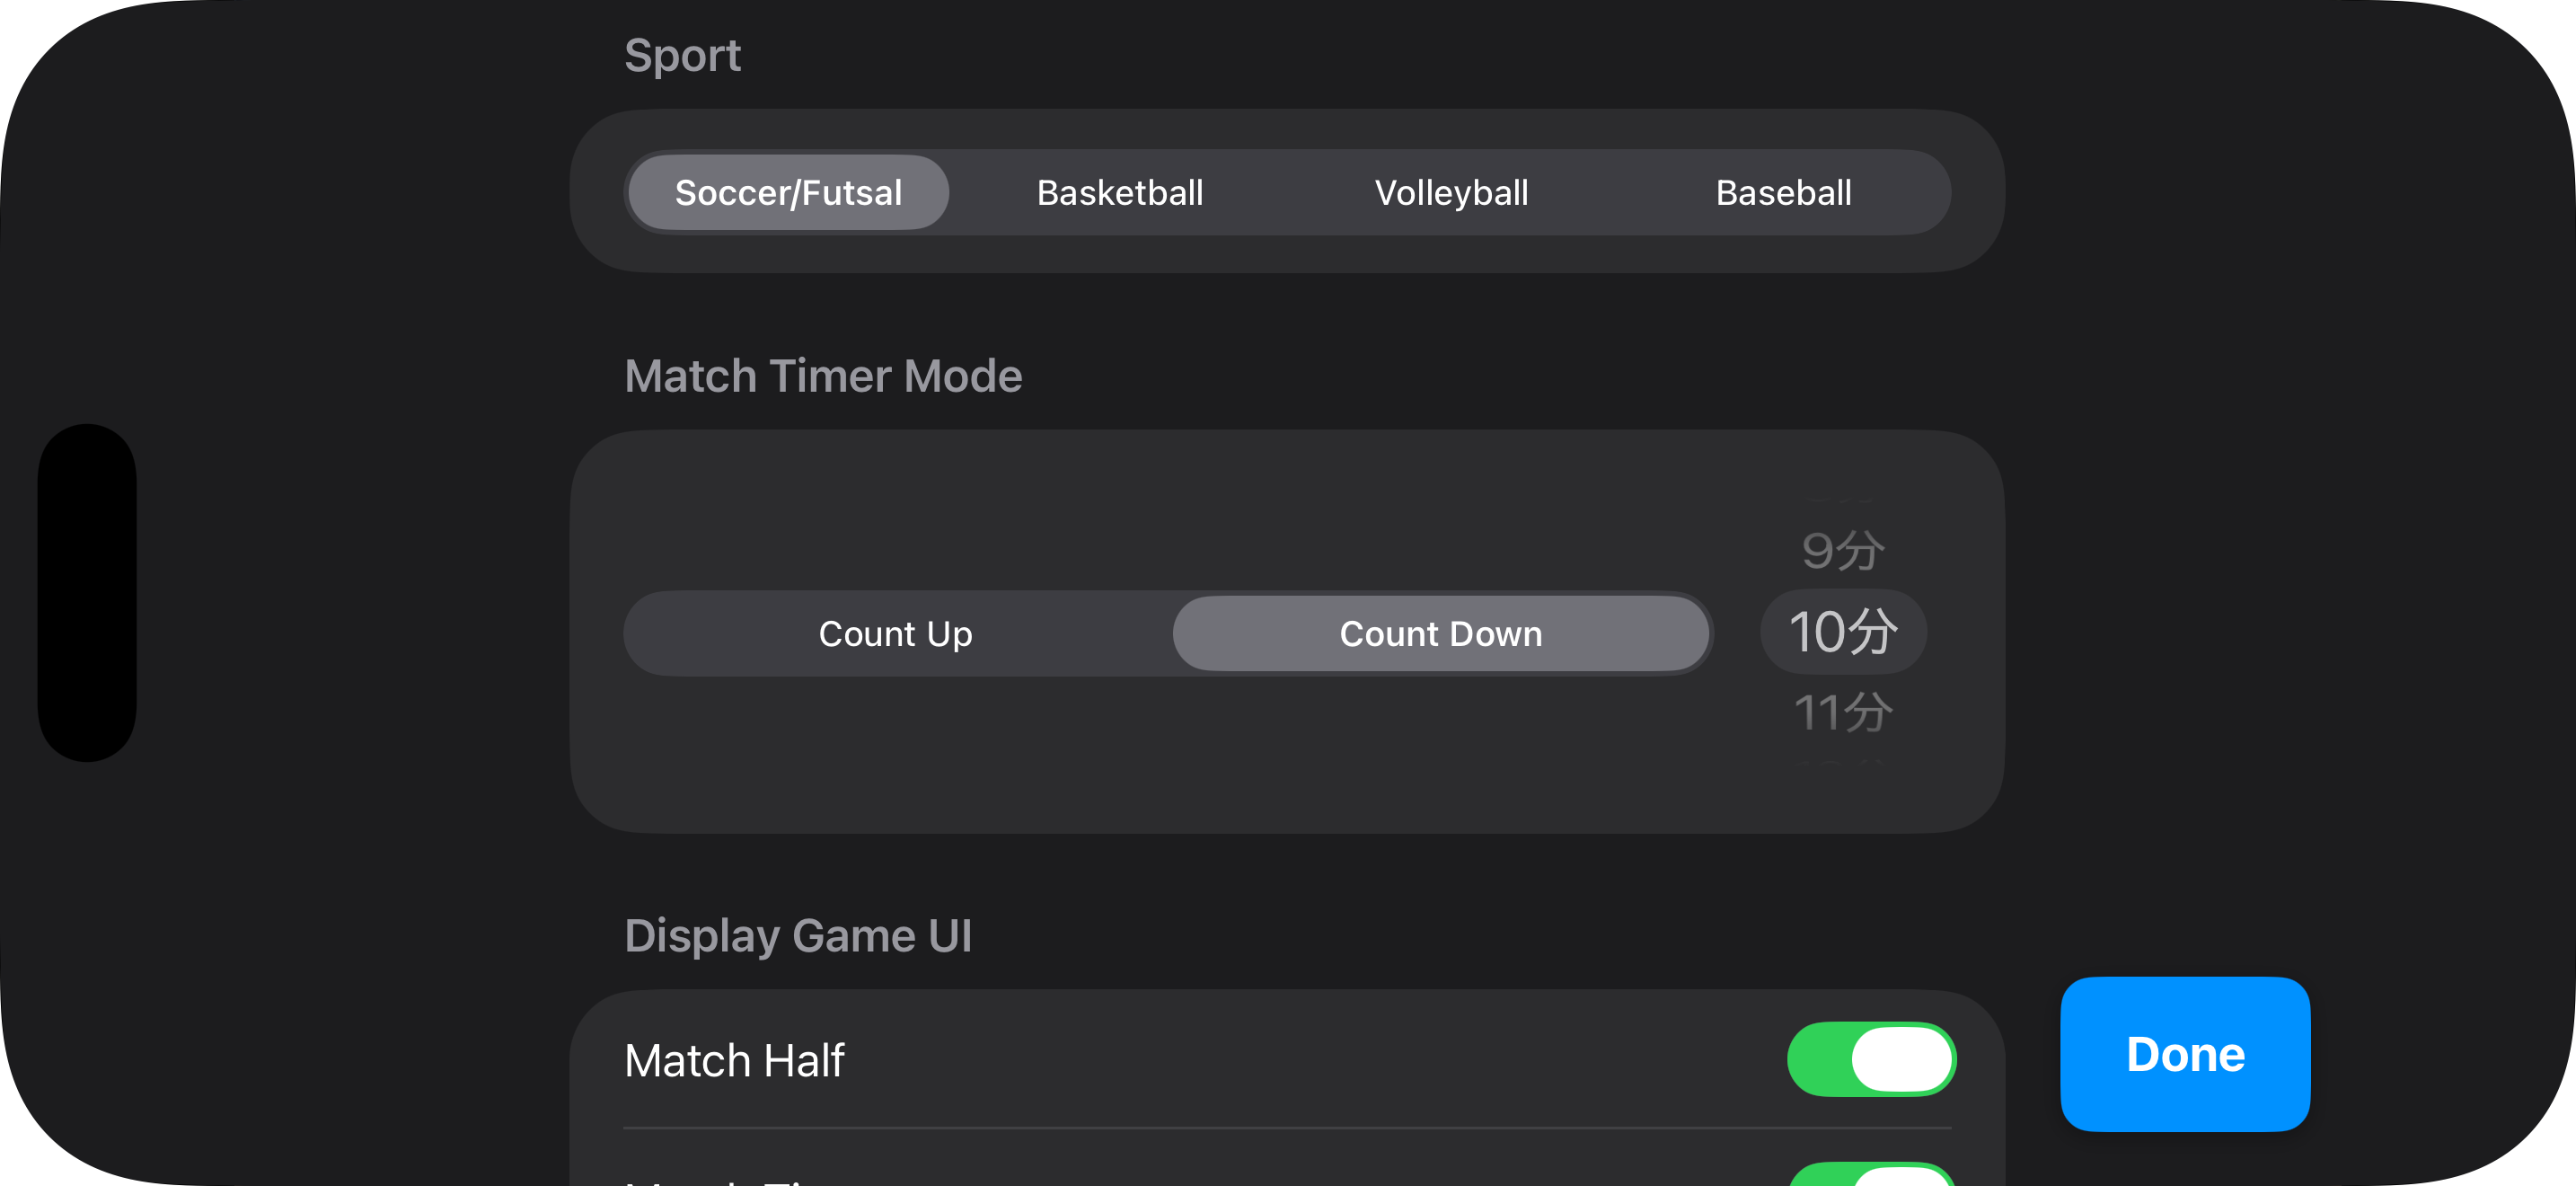
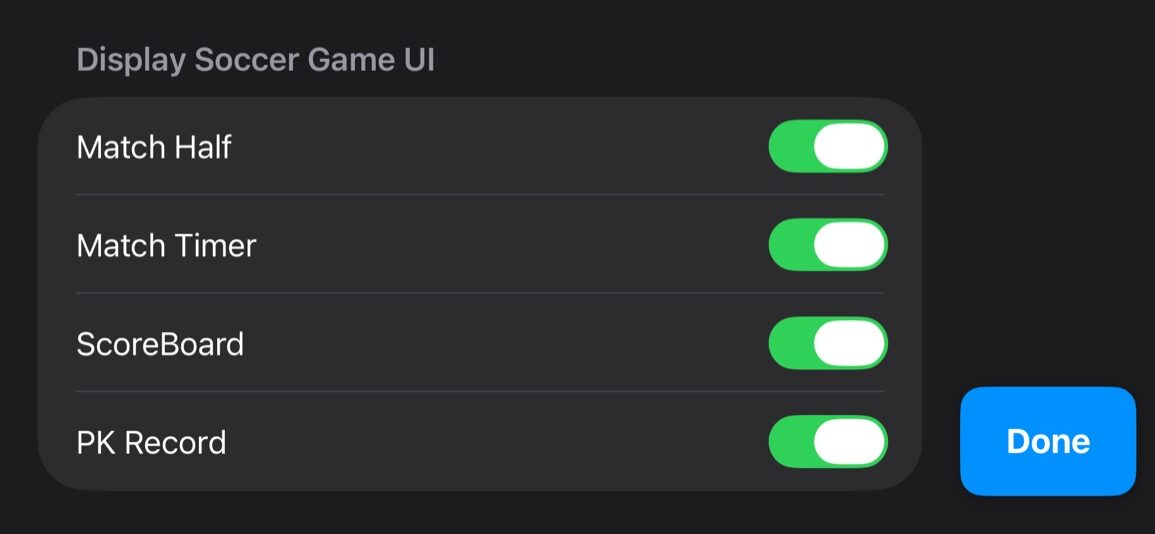
3.3 Settings
You can select the type of sports (ver1.8.0+), set the match timer, show or hide match information, and change the frame rate (the frame rate option is not shown in the screenshot).
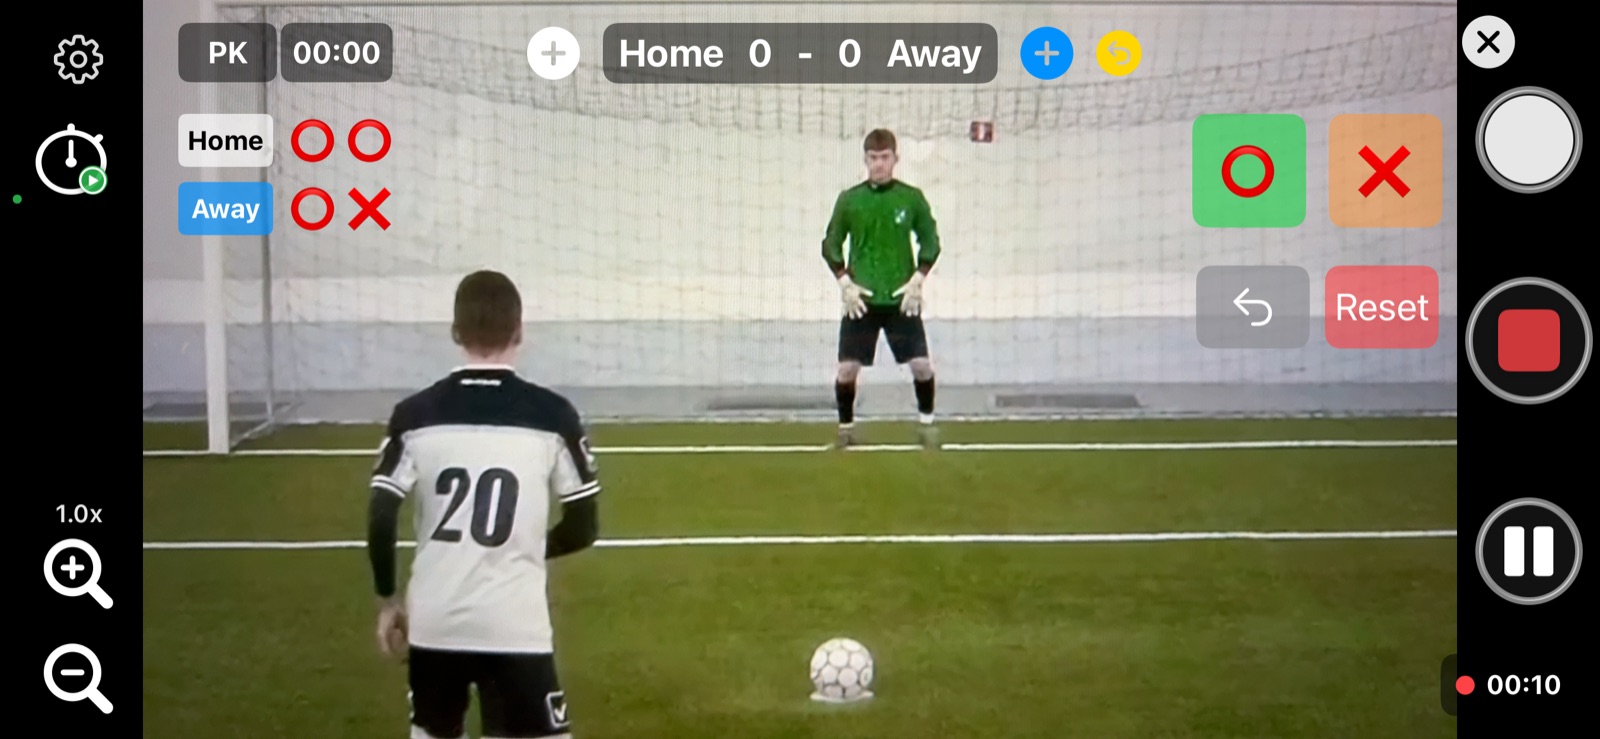
3.4 PK Mode
Select which team will go first.
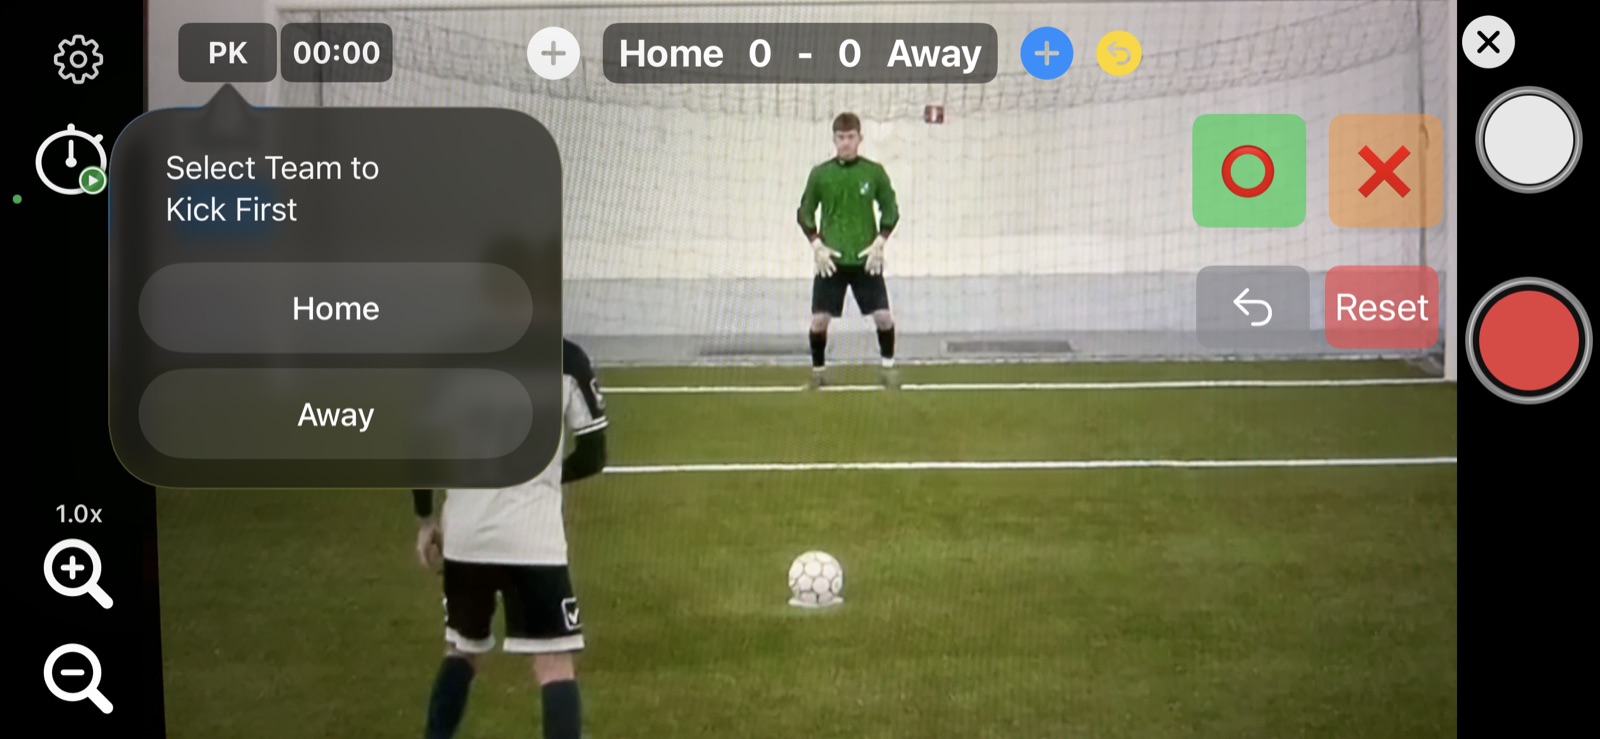
Tap the ⭕️ or ❌ buttons to mark whether a play was successful (⭕️) or unsuccessful (❌).
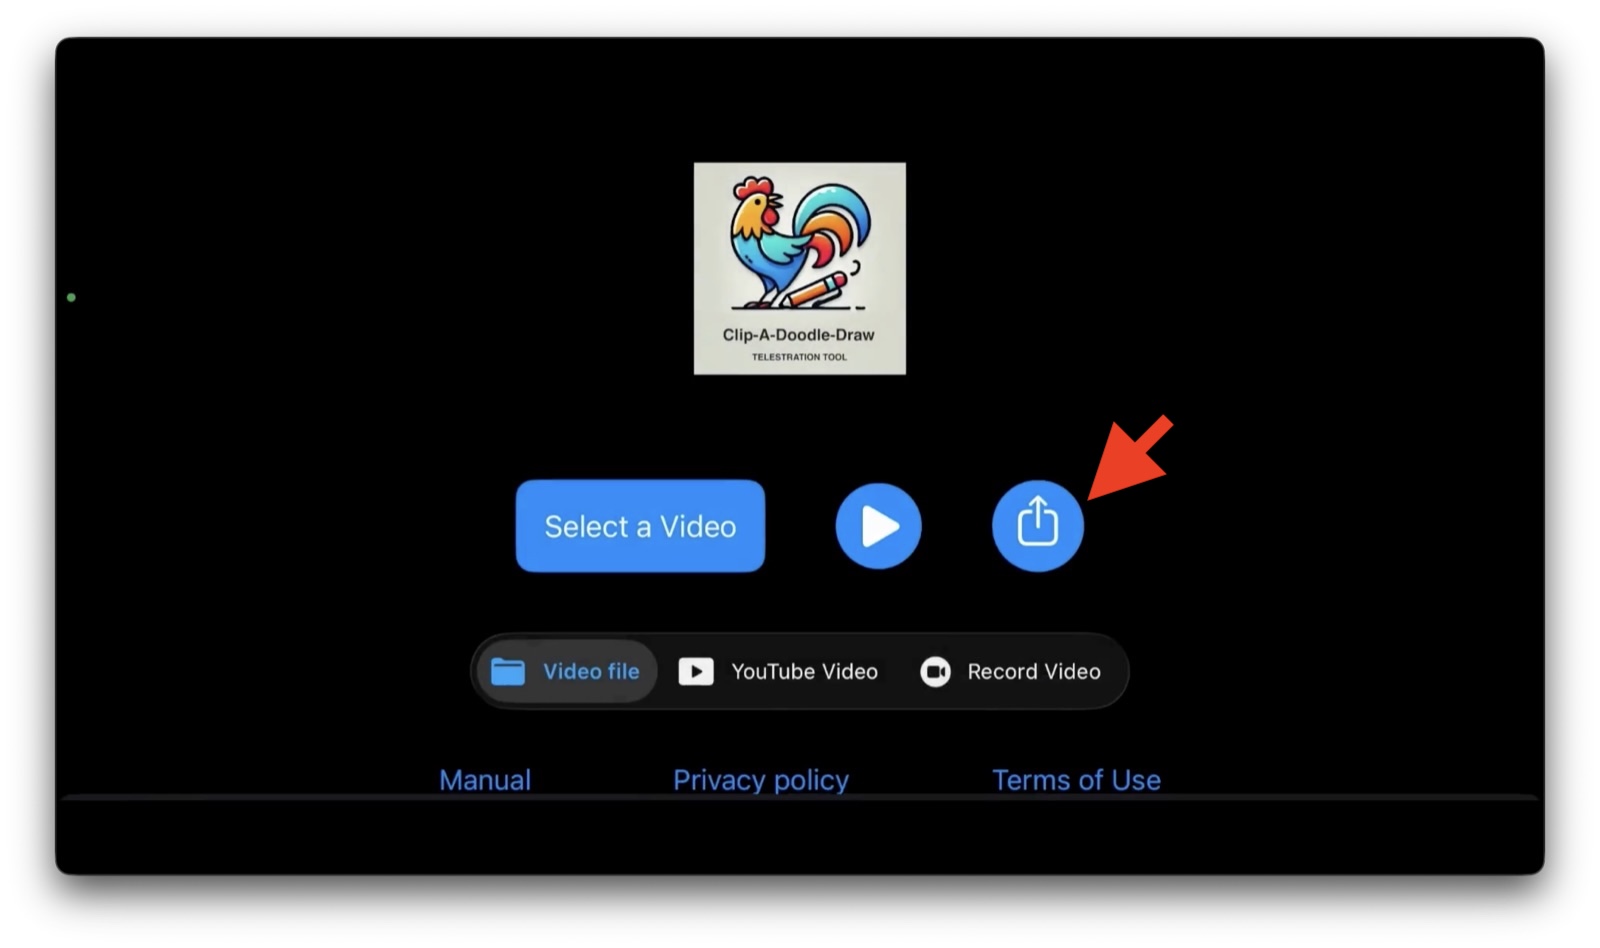
4. Basic Operations – Video Sharing (available from ver. 1.10.0)
Videos recorded with Clip-A-Doodle-Draw can be shared to YouTube and other platforms.
To share a video, tap “Select a Video” on the home screen and choose the desired video. Then tap the Share button to send it to other apps.
When sharing a video, a list of highlights with timestamps can be copied to the clipboard. This list can be used to easily create chapters on YouTube.
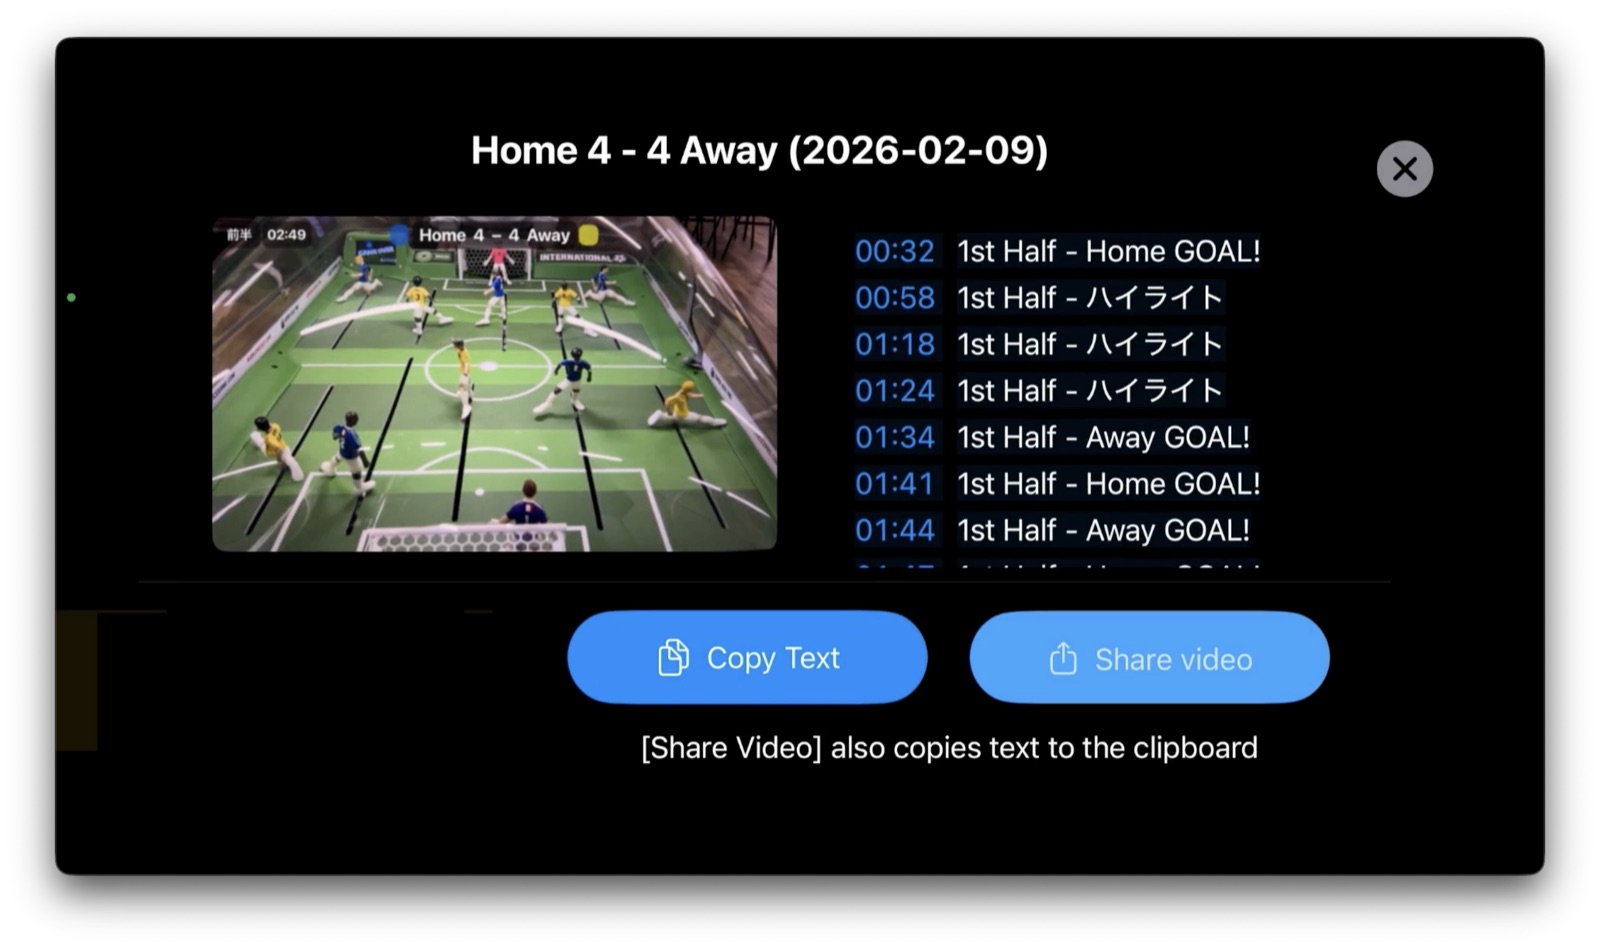
By pasting the timestamped highlights into a YouTube video description, chapters are automatically generated, allowing viewers to quickly jump to each scene during playback.
Chapter-based navigation is also supported when playing YouTube videos within Clip-A-Doodle-Draw.
5. Help and Support
Please contact the developer via “お問い合わせ” (which means “Contact Us”) at the bottom of this page.
Have fun with the app ⚽🎨✏️🎥—draw, capture, and enjoy!